
Thème suivant : Pion passé sur une aile
Retour aux finales de tour
Position de Philidor
Position de Philidor
Pont de Lucéna
[lang_fr]
|
|||||||||||||||||||||||||||||||||||||||||||||||||||||||||||||||||||||||||
| La position de Philidor telle qu’elle est étudiée dans Analyse du jeu des échecs (trait aux blancs). | |||||||||||||||||||||||||||||||||||||||||||||||||||||||||||||||||||||||||
Aux échecs, la position de Philidor est l’une des plus connues et des plus importantes positions de finales du jeu d’ échecs. Elle est fondamentale dans la finale tour et pion contre tour. Elle a été analysée par Philidor en 1777. C’est la technique la plus simple pour annuler une finale de tour et pion contre tour.
Sommaire |
L’étude de Philidor
[Haut de page]
Le défenseur place son roi sur la case de promotion du pion et sa tour sur la sixième rangée pour empêcher le roi de son adversaire de passer devant son pion. Pour tenter de progresser, celui-ci est forcé d’avancer son pion sur la sixième rangée. Le défenseur place alors sa tour sur la première rangée et obtient l’annulation de la partie par des échecs successifs sur le roi de son adversaire.
La position de Philidor telle quelle est étudiée dans la réédition de 1821 de L’analyse du jeu des échecs :
« Partie remise 1 d’une tour et d’un pion contre une tour: 1. e5 Tb6 En conservant cette ligne avec sa tour, il empêche votre Roi d’avancer; mais s’il quittait cette même ligne avant que vous eussiez poussé votre pion, il perdrait la partie; comme on le verra dans la partie suivante. 2. Ta7 Tc6 Il ne doit quitter cette ligne avec sa tour, qu’au moment où vous pousserez votre pion. 3. e6 Tc1 S’il avait donné l’échec, il aurait perdu la partie. 4. Rf6 Tf1+ Il doit continuer de vous donner des échecs, pour vous faire abandonner votre pion; et au moment que votre roi viendra sur sa tour, il attaquera votre pion et le prendra. 2 »
Les blancs ne peuvent que déplacer leur roi pour parer les échecs de la tour noire. Pour pouvoir interposer leur tour, ils doivent éloigner leur roi sur la 8e rangée (en g8 et en c8), et après l’échange des tours, le roi noir capture sans difficulté le pion blanc. Comme le dit Philidor, si les blancs cherchent à soustraire leur roi aux échecs en le rapprochant de la tour noire, celle-ci doit se replacer sur la case e1 car une fois que le Roi blanc a atteint la troisième rangée, il ne peut plus protéger son pion.
L’annulation de la finale tour et pion contre tour
|
|||||||||||||||||||||||||||||||||||||||||||||||||||||||||||||||||||||||||
| Finale tour et pion contre tour (trait aux noirs) partie nulle. | |||||||||||||||||||||||||||||||||||||||||||||||||||||||||||||||||||||||||
Le diagramme ci-contre présente la fin d’une finale tour et pion contre tour. Les noirs peuvent entrer dans la position de Philidor en jouant 1… Tg6!.
Contrairement à ce qu’affirmait Philidor, si les noirs placent leur tour sur la première rangée par 1… Tg1?!, les blancs ne peuvent forcer le gain: après 1… Tg1 2. Th7+ Re8 3. Rd6, le roi noir a pénétré sur la 6e rangée.
3… Tg6+?? mène à la défaite par 4. e6 (menace de mat du couloir) Tg8 (4…Rf8 retarde le mat selon les tables de finales de Nalimov) 5. Ta7 Rf8 6. Ta8+ Rg7 puis échange des tours et les noirs ne peuvent empêcher la promotion du pion
3… Td1+?? 4. Re6 le pion protège le roi blanc des échecs de la tour noir et la menace de mat du couloir oblige le roi noir à s’éloigner de la case de promotion de son pion. Les blancs peuvent donc entrer dans la position de Lucena et promouvoir le pion.
3… Te1 est le seul coup jouable, 4. Th8+ Rf7 5. Th7+ (la tour noire en e1 empêche 5. e6+) 5… Re8 6. Re6 (menace de mat du couloir) 6… Rf8 7. Th8+ Rg7 8. Ta8 Te2 (coup d’attente) 9. Rd6 Rf7 (9… Td2?? 10. Re7 et le pion blanc peut avancer et être promut) 10. Ta7+ Re8 11. Re6 Rf8 12. Ta8+ Rg7 13. Te8 (dernière tentative pour faire progresser le roi et le pion) 13… Ta2 (menace de faire des échecs latéraux sur le roi blanc) 14. Td8 pour parer les échecs, 14… Te2, les blancs sont revenus au même point qu’après 12…Rg7. Comme dans la position de Lucena, le roi noir est éloigné de la case de promotion du pion blanc, mais ce dernier ne peut progresser vers la septième rangée.
Cependant, comme le fait remarquer Jeremy Silman (qui donne les variantes présentées ci-dessus) : « Même si nous avons établi que les noirs peuvent faire nulle sans jouer 1…Tg6 !, ils ont alors drôlement besoin de savoir ce qu’ils font pour y arriver. Pourquoi se compliquer la vie? Tout demeure si simple après 1…Tg6 ! 3 »
La finale tour et fou contre tour
|
|||||||||||||||||||||||||||||||||||||||||||||||||||||||||||||||||||||||||
| L’autre position de Philidor (trait aux blancs). | |||||||||||||||||||||||||||||||||||||||||||||||||||||||||||||||||||||||||
Une autre position étudiée par Philidor, une finale tour et fou contre tour, est parfois appelée position de Philidor.
Divers
- La Position de Philidor est le titre d’un roman policier de René-Victor Pilhes.
[/lang_fr]
[lang_en]
Philidor position
The Philidor position (or Philidor’s position) usually refers to an important chess endgame which illustrates a drawing technique when the defender has a king and rook versus a king, rook, and pawn. It is also known as the third rank defense, because of the importance of the rook on the third rank cutting off the opposing king. It was analyzed by François-André Danican Philidor in 1777. (Also see rook and pawn versus rook endgame.) Most rook and pawn versus rook endgames reach either the Philidor Position or the Lucena Position if played accurately. The Philidor position is perhaps the most important position in endgame theory ( de la Villa 2008:125).
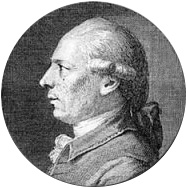
Philidor (1726-1795)
Philidor analyzed many positions, some of which have his name associated with them (see the subsequent sections).
Contents |
Philidor’s position, rook and pawn versus rook
Philidor position, 1777
| a | b | c | d | e | f | g | h | ||
| 8 | 8 | ||||||||
| 7 | 7 | ||||||||
| 6 | 6 | ||||||||
| 5 | 5 | ||||||||
| 4 | 4 | ||||||||
| 3 | 3 | ||||||||
| 2 | 2 | ||||||||
| 1 | 1 | ||||||||
| a | b | c | d | e | f | g | h |
The diagram shows an example of Philidor’s position. The important characteristics of the position are (from the point of view of the defender):
- the defending king (White in this diagram) is on the queening square of the pawn (or adjacent to it). The pawn can be on any file.
- the opposing pawn has not yet reached the defender’s third rank (its sixth rank).
- the opposing king is beyond the defender’s third rank.
- the defender’s rook is on the third rank, keeping the opposing king off that rank.
Black would like to get his king to the e3 square and threaten checkmate to force the white king away from the queening square of the pawn, e1. The white rook on the third rank prevents that. If Black checks with the rook from the side, White simply keeps the king in front of the pawn by alternating between squares e1 and e2. If Black offers an exchange of rooks White should take it, since the resulting king and pawn endgame is drawn (see King and pawn versus king endgame).
So Black’s only chance of progress is to advance the pawn. The basic idea is for the defender to keep his rook on his third rank until the pawn advances to that rank, then check the opposing king from behind. Here is a possible continuation:
- 1. … Rb2
- 2. Rc3 Ra2
- 3. Rb3 e3
Black plans to move Kf3, then if he is unopposed, checkmate with the rook or advance the pawn. (A passive defense does not work.)
- 4. Rb8!
Since now Black’s king cannot move to e3, it is safe to move the rook away to the far end of the board (the defender’s seventh or eighth rank). Note that 4.Rb4+ (??) loses immediately to 4…Kf3 when black will checkmate or force the exchange of rooks followed by Kf2 and promotion of the pawn.
- 4. … Kf3
- 5. Rf8+ Ke4
- 6. Re8+
The black king can not hide from the checks without giving up the pawn; nor can he approach the rook:
- 6. … Kf4
- 7. Rf8+ Ke5
- 8. Re8+
The defender’s rook must be on his seventh or eighth rank for this defense to work.
To sum up the defense: the defender should keep his king in front of the opposing pawn and keep his rook on the third rank until the pawn advances to that rank, then go to the far end of the board (the seventh or eighth rank) and check the king from behind. If the attacker tries to get his king to his sixth rank by moving his rook to that rank first to block the checks, the defender simply exchanges rooks and has a drawn king and pawn versus king endgame.
Philidor, 1777
| a | b | c | d | e | f | g | h | ||
| 8 | 8 | ||||||||
| 7 | 7 | ||||||||
| 6 | 6 | ||||||||
| 5 | 5 | ||||||||
| 4 | 4 | ||||||||
| 3 | 3 | ||||||||
| 2 | 2 | ||||||||
| 1 | 1 | ||||||||
| a | b | c | d | e | f | g | h |
[/lang_en]
[lang_en]
Philidor actually studied a position that leads to the type of position above. In this position, if it is Black’s turn to move, he moves
- 1. … Rb4
and then his rook will reach his third rank, and the position is basically the same as the diagram above, with colors reversed. If White is to move, he wins with accurate play by
- 1. Ke6 Kf8 (2. Ra8# is threatened, moving the king to the « short side » of the pawn is relatively better than to the other side)
- 2. Ra8+ Kg7
- 3. Kd6 Rd4+
- 4. Ke7 Rb4
- 5. e6
etc., and wins ( Nunn 1999:281–82).
| a | b | c | d | e | f | g | h | ||
| 8 | 8 | ||||||||
| 7 | 7 | ||||||||
| 6 | 6 | ||||||||
| 5 | 5 | ||||||||
| 4 | 4 | ||||||||
| 3 | 3 | ||||||||
| 2 | 2 | ||||||||
| 1 | 1 | ||||||||
| a | b | c | d | e | f | g | h |
Philidor’s defense can also be used if the pawn is less advanced. In that case, the defending rook can occupy its fourth rank instead of its third rank and the defending king should be on at least its second rank. When the pawn reaches the rank of the defending rook, the rook moves to its eighth rank to check the opposing king from behind (assuming that the opposing rook is not on that rank) ( Howell 1997:42), ( Rogers 2010:41).
Queen versus rook
Philidor, 1777
| a | b | c | d | e | f | g | h | ||
| 8 | 8 | ||||||||
| 7 | 7 | ||||||||
| 6 | 6 | ||||||||
| 5 | 5 | ||||||||
| 4 | 4 | ||||||||
| 3 | 3 | ||||||||
| 2 | 2 | ||||||||
| 1 | 1 | ||||||||
| a | b | c | d | e | f | g | h |
Philidor studied many endgame positions. Another one that he studied in 1777 (and is also called Philidor’s Position) involves a queen versus a rook (see the diagram).
If Black is to move in this position, he quickly loses his rook by a fork (or gets checkmated). For example,
- 1. … Rb1
- 2. Qd8+ Ka7
- 3. Qd4+ Ka8
- 4. Qh8+ Ka7
- 5. Qh7+
If White is to move in this position, he would like to be in this position except with Black to move. This can be accomplished by triangulation:
- 1. Qe5+ Ka8
- 2. Qa1+ Kb8
- 3. Qa5
and now it is back to the same position but Black has to move (and is in Zugzwang) ( Nunn 2002:50–51), ( Müller & Pajeken 2008:178). Nunn describes that with the pieces in the center of the board the queen ought to force the rook towards the Philidor position. Nunn describes the various retreat positions for the rook, the « fourth, third, second » rank defenses, then the « Philidor position ». The rook can be won in fewer than fifty moves, avoiding a draw by the fifty-move rule.
Rook and bishop versus rook
Philidor, 1749
| a | b | c | d | e | f | g | h | ||
| 8 | 8 | ||||||||
| 7 | 7 | ||||||||
| 6 | 6 | ||||||||
| 5 | 5 | ||||||||
| 4 | 4 | ||||||||
| 3 | 3 | ||||||||
| 2 | 2 | ||||||||
| 1 | 1 | ||||||||
| a | b | c | d | e | f | g | h |
Another famous position studied by and named after Philidor is in the ending of a rook and bishop versus a rook (diagram). White wins because his king has reached the sixth rank and black’s king is poorly placed (opposite the white king) ( Howell 1997:148–50). If this type of position arises, it is usually because of inferior defense. Nevertheless, it is tricky to win ( Nunn 2007:163).
[/lang_en]